Smart Home / Smart Locks
Installation Instructions for Lockwood Induro Mortice Lock 2-Point
A comprehensive installation and operation guide for the Lockwood Induro Mortice Lock 2-Point. This manual covers door preparation, deadbolt projection settings, furniture installation, latch reversal, and troubleshooting.
Quick answers from the manual
Quick answer
- The Lockwood Induro Mortice Lock 2-Point is installed by routing the door according to the backset (30/40/50mm), setting the deadbolt throw (13mm or 24mm), fixing the lock assembly, and attaching the furniture with the appropriate M4 screws based on stile width. p. 1, 2, 3
Key actions
- Set deadbolt throw before fixing the lock. p. 3
- Reverse the latch if necessary. p. 4
Problems and fixes
Furniture screws do not tighten
Ensure screws line up with the screw boss on the exterior handle.
p. 4Maintenance and reset
- Latch reversal procedure. p. 4
Technical specifications
| Parameter | Value | Meaning | Pages |
|---|---|---|---|
| M4 x 49mm | 38 - 43mm | Screw length for Stile Width | p. 1 |
| M4 x 55mm | 43 - 49mm | Screw length for Stile Width | p. 1 |
| M4 x 60mm | 46 - 55mm | Screw length for Stile Width | p. 1 |
| M4 x 65mm | 55 - 58mm | Screw length for Stile Width | p. 1 |
Where to find it in the PDF
- Pack Contents and Screw Selection p. 1
- Door Preparation p. 2
- Installation Steps p. 3
- Latch Reversal and Operation p. 4
Table of contents
Manual images
Click an image to enlargeQuick Guide from the Manual
This document provides installation instructions for the Lockwood Induro Mortice Lock 2-Point. Before beginning, ensure you have the correct tools: a drill, 3.2mm, 10.0mm, and 20.0mm drill bits, a Phillips #2 screwdriver, and a Square #1 screwdriver. Verify your door stile width to select the appropriate screw length from the provided chart.
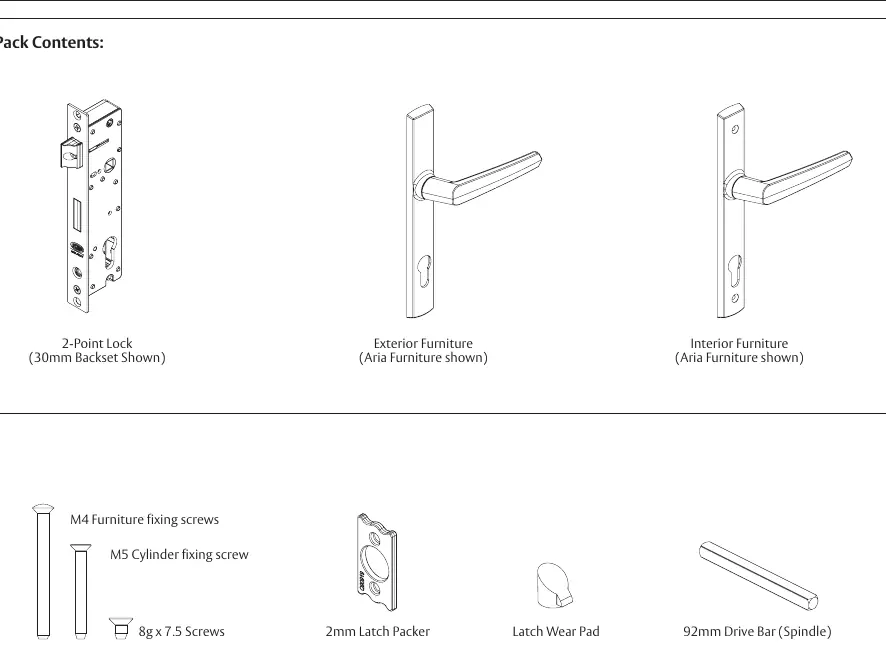
Pack Contents
The package includes the 2-Point Lock, exterior and interior furniture, M4 furniture fixing screws, M5 cylinder fixing screw, 8g x 7.5 screws, 2mm latch packer, latch wear pad, and a 92mm drive bar (spindle).
Door Preparation
Route the door according to the specific backset requirements:
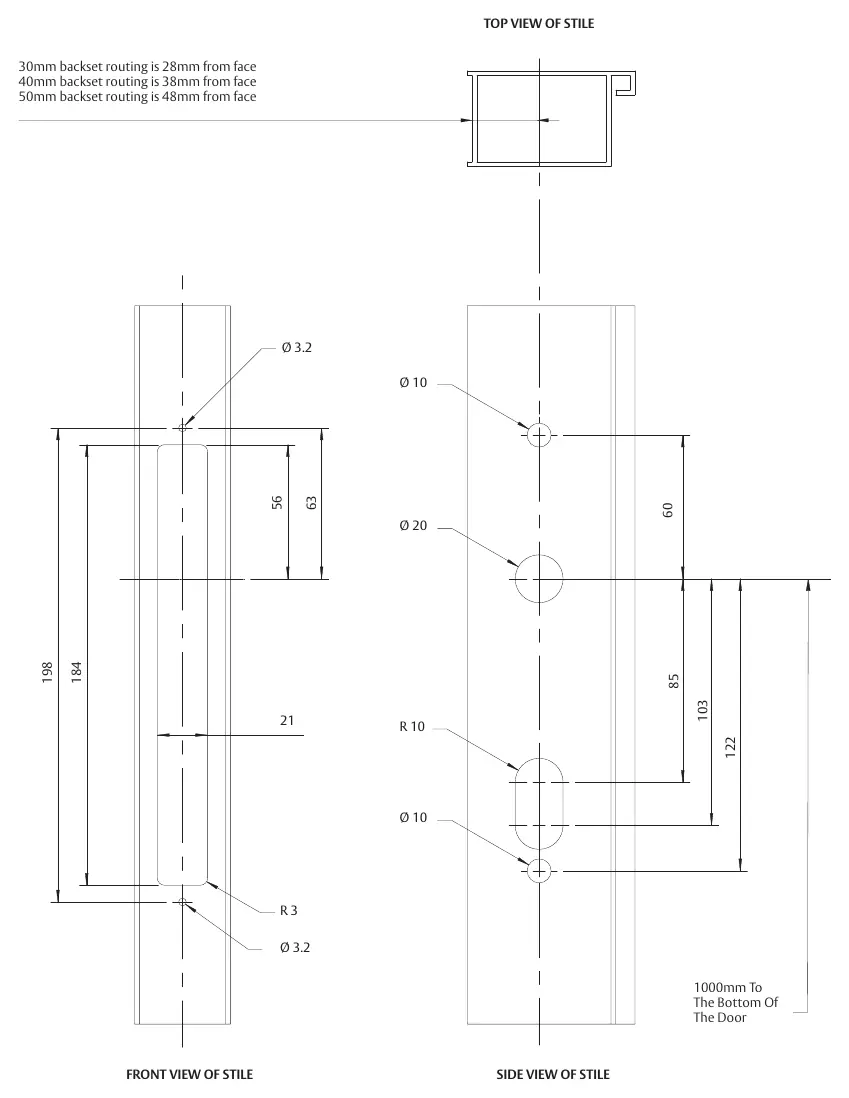
- 30mm backset: 28mm from face
- 40mm backset: 38mm from face
- 50mm backset: 48mm from face
Refer to the routing diagram in the manual for precise measurements and hole locations (Ø 3.2, Ø 10, Ø 20, R 10, R 3).
Setting Deadbolt Projection
Before fixing the lock into the stile, select the correct deadbolt throw:
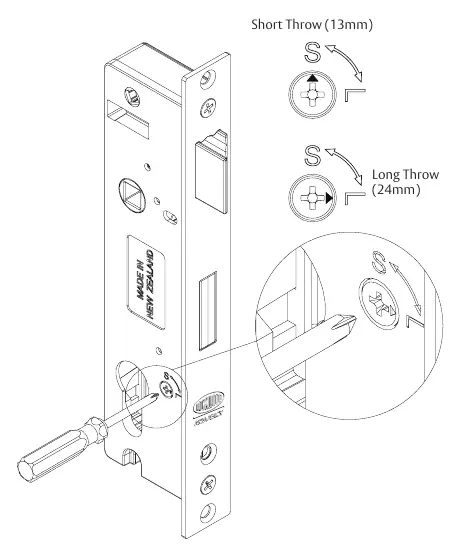
- Short Throw (13mm): Select 'S'. The key must be rotated once to deadlock.
- Long Throw (24mm): Select 'L'. The key must be rotated twice to deadlock.
Ensure the arrow on the lock is pointing to the desired throw application.
Fixing Lock and Furniture
- Place the lock assembly into the stile and fix it using the two 8g x 7.5 screws.
- Insert the drive bar (spindle) through the square drive hole in the lock.
- Place the furniture onto the drive bar, ensuring the interior handle is on the inside of the house.
- Place the cylinder through the cylinder hole and fix it using the supplied M5 cylinder fixing screw.
- Fix the furniture together using the two M4 furniture fixing screws. Refer to the screw selection chart based on your stile width (38-43mm, 43-49mm, 46-55mm, 55-58mm).
Latch Reversal
If required, you can reverse the latch:
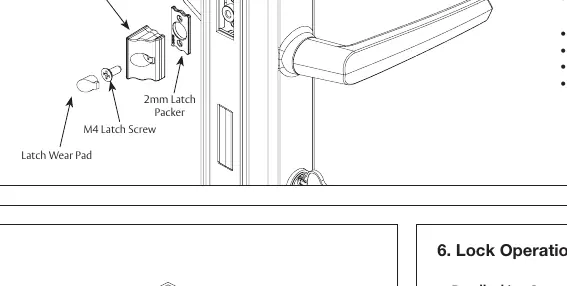
- Undo the M4 latch screw.
- Reverse the latch as desired.
- Refasten the M4 latch screw to secure the latch.
- Insert the latch wear pad.
A 2mm Latch Packer is provided for projection adjustment.
Lock Operation
Deadlocking Operation: Pull the door shut to self-latch. Turn the key towards the edge of the door to deadlock. For 13mm throw, turn once; for 24mm throw, turn twice.
Opening Operation: Turn the key away from the door edge to deactivate the deadlock, then retract the latch.
Practical help
Common problems
The furniture screws do not tighten
Ensure the screws line up with the screw boss on the exterior handle.
The key function does not operate
Ensure the motion of the latch is not restricted.
Cannot achieve 24mm deadbolt throw
Ensure the lock deadlock is set to 'L' and turn the key twice.
Do I need to tap holes?
No, all screws are self-tapping.
Before use
- Verify door stile width to select correct screw length (38-58mm range).
- Ensure you have a drill and bits: 3.2mm, 10.0mm, 20.0mm.
- Ensure you have a Phillips #2 and Square #1 screwdriver.
- Decide on deadbolt throw: 13mm (S) or 24mm (L).
- Check that the interior handle will be on the inside of the house.
Specs in practice
- 30mm Backset
- Requires routing 28mm from the door face.
- 40mm Backset
- Requires routing 38mm from the door face.
- 50mm Backset
- Requires routing 48mm from the door face.
Images and diagrams
- Routing diagram shows precise hole positions and dimensions for the stile.
- Screw selection chart maps M4 screw lengths to specific stile widths.
- Deadbolt projection diagram shows how to switch between S (13mm) and L (24mm) settings.
Model compatibility
- For Palladium Xtra Furniture with daylatch snib, refer to separate instructions.
- Only use the supplied screws for best performance.

Manual page author
Emily Carter
User documentation editor
Prepares concise manual descriptions and highlights the most useful setup, operation, and maintenance information for readers.