General / Other Manuals
Installation and Care Guide for Falcon Ridge Kawasaki Pro FXT Full Cab Enclosure
A comprehensive installation and maintenance guide for the Falcon Ridge Kawasaki Pro FXT Full Cab Enclosure. Includes step-by-step instructions for installing doors, windows, and the top cap, along with cleaning and storage tips.
Table of contents
Manual images
Jump to the sectionQuick guide from the manual
This document provides installation and care instructions for the Falcon Ridge Full Cab Enclosure designed for the Kawasaki Pro FXT. The installation process involves securing various panels using adhesive Velcro strips and webbing straps. For optimal results, perform the installation in temperatures of 70 degrees F or warmer to ensure the adhesive Velcro bonds correctly. If necessary, store the adhesive strips at room temperature before installation.
Safety and Warnings
Warning: The cab enclosure is flammable. Do not smoke inside the cab or expose the enclosure to direct flames.
Installation Procedure
The cab should be assembled in the following order: Front Doors, Middle Rear Window, Rear Doors, Rear Window, and Top Cap.
Front Doors
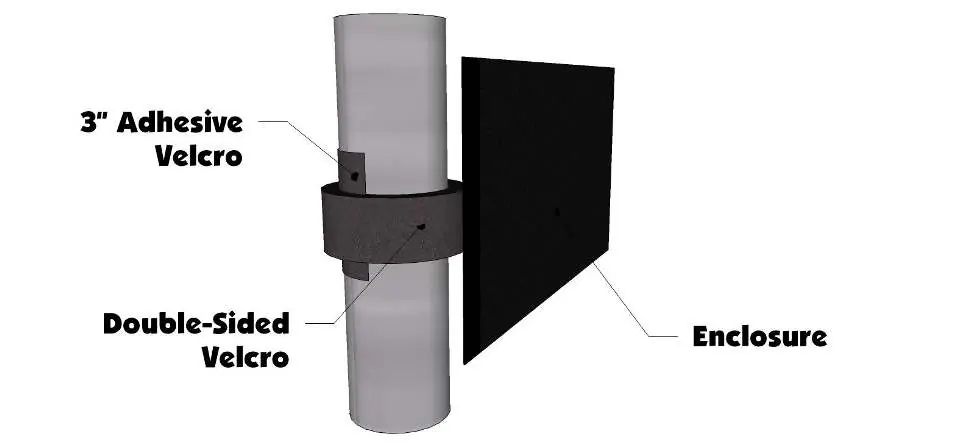
Mark the location of Velcro strips on the roll cage, apply the 3-inch adhesive strips, and attach the door using the double-sided Velcro. For the rear edge of the front door, use 45-inch adhesive strips placed on the backside of the middle bar, cutting them to fit around the bar mount.
Middle Rear Window
Secure the window using 48-inch adhesive strips across the top and 60-inch strips across the bottom. The sides are held in place by the 45-inch strips previously installed for the doors.
Rear Doors
Attach the top using double-sided Velcro. For the bottom snaps, install the snap studs into the sockets on the door first, zip the door shut, and press the screw end against the plastic to mark the location before screwing them in.
Rear Window
Adhere 48-inch strips across the top and 13-inch strips down the sides of the movable rear panel. Attach the window, then secure the bottom using a 60-inch adhesive strip.
Top Cap
Install the top cap using either grommet straps (if your windshield has bolts/clamps) or Velcro straps. Secure the rear using the loop-end straps under the bed rail. Ensure the top is centered and all webbing is pulled tight through the buckles.
Cleaning and Storage
Clean the enclosure with a soft rag or sponge using a mild liquid detergent and warm water. Never rub the windows with a dry cloth. For storage, roll the cab (approximately 8 inches in diameter) rather than folding it to prevent damage to the windows. Store at room temperature.
Practical help
Common problems
Adhesive Velcro not sticking well
Ensure installation is performed in temperatures of 70 degrees F or warmer. Store adhesive strips at room temperature prior to installation.
Window damage during storage
Never fold the cab. Always roll it up (approx. 8 inches in diameter) on a clean, flat surface.
Difficulty with snap stud placement
Snap the studs into the door sockets first, zip the door shut, and press the screw end against the plastic to mark the exact location before installation.
Before use
- Ensure the installation area is clean and free of dirt.
- Verify all parts are present according to the parts list.
- Check the ambient temperature (ideally 70 degrees F or warmer).
- Have a second person available to help hold doors in place during marking.
- Ensure the windshield is clean before applying any adhesive strips.
Specs in practice
- Adhesive Velcro strips
- Used for securing panels to the roll cage; various lengths (3" to 60") are provided for specific sections.
- Double-sided Velcro
- Used to wrap around the adhesive strips on the roll cage to hold the enclosure panels firmly.
- Webbing straps
- Used for securing the Top Cap; includes versions with grommets, loops, or Velcro depending on windshield type.
Images and diagrams
- Diagrams on page 3 illustrate the correct method for wrapping double-sided straps around the 3-inch adhesive Velcro on the roll cage.
- The webbing lacing diagram on page 9 shows how to properly thread the straps through the buckles for a secure fit.
Model compatibility
- Designed specifically for the Kawasaki Pro FXT.
- Top Cap installation method varies based on the type of windshield installed (bolts/clamps vs. Velcro).

Manual page author
David Miller
Documentation analyst
Organizes user manual content into clear summaries, with attention to model details, product context, and everyday usability.