Home / Security
Installation Guide for Honeywell 205820A Foot-Mount Bracket
Installation guide for the Honeywell 205820A Foot-Mount Bracket. Includes mounting procedures for standard and high-torque Direct Coupled Actuators (DCA), parts list, and assembly diagrams.
Quick answers from the manual
Quick answer
- The 205820A Foot-Mount Bracket is designed for three-point mounting of Direct Coupled Actuators (DCA). Installation differs based on whether the actuator is a standard or high-torque model. p. 1
Key actions
- Perform standard mounting using standoffs. p. 1
- Perform high-torque mounting without standoffs. p. 1
Technical specifications
| Parameter | Value | Meaning | Pages |
|---|---|---|---|
| Parts Included | Bracket (1), Hexagonal Standoffs (3), Screws (3), Lockwashers (3) | Required components for assembly. | p. 1 |
Where to find it in the PDF
- Installation Instructions p. 1, 2
Table of contents
Manual images
Click an image to enlargeQuick Guide
The Honeywell 205820A Foot-Mount Bracket is designed for the three-point mounting of Direct Coupled Actuators (DCA). Installation must be performed by a trained, experienced service technician. Always verify product ratings against your specific application before installation.
Specifications
The kit includes the following parts:
- 1 Bracket
- 3 Hexagonal Standoffs
- 3 Screws
- 3 Lockwashers
Installation
Mounting procedures vary depending on the DCA model. High-torque models (150 lb-in. and 300 lb-in.) do not require standoffs.
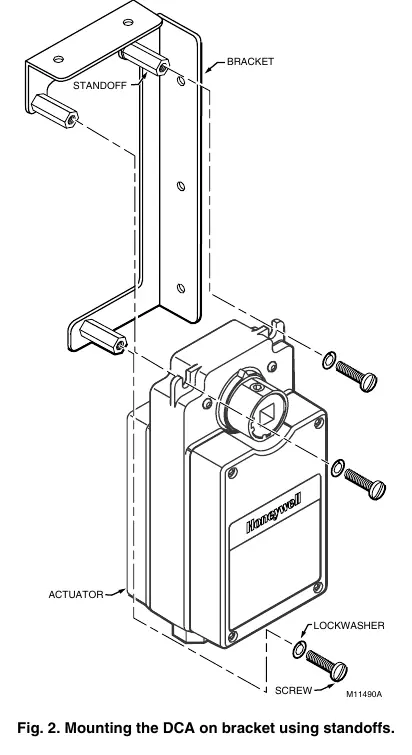
Standard Mounting
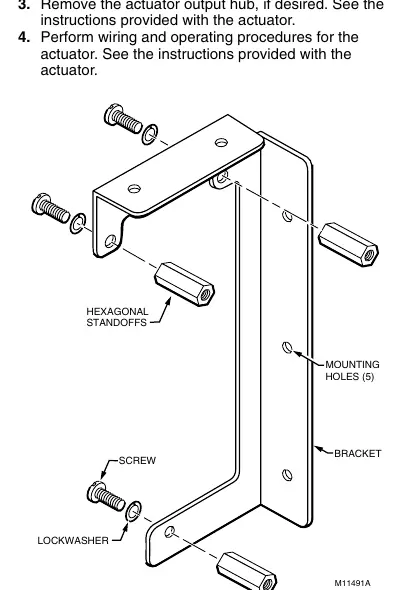
- Attach the 1/2 in. (13 mm) hexagonal standoffs to the bracket using three 1/4 in. screws and lockwashers.
- Mount the bracket to the surface using any two of the five mounting holes.
- Attach the DCA to the open end of the hexagonal standoffs using three 1/4 in. screws and lockwashers.
- Remove the actuator output hub if desired (refer to actuator instructions).
- Perform wiring and operating procedures as specified in the actuator instructions.
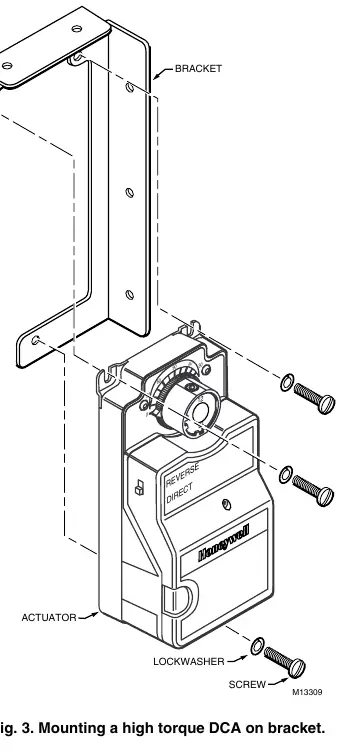
High-Torque Mounting
- Mount the bracket to the surface using any two of the five mounting holes.
- Attach the DCA directly to the bracket using three 1/4 in. screws and lockwashers.
- Remove the actuator output hub if desired (refer to actuator instructions).
- Perform wiring and operating procedures as specified in the actuator instructions.
Manufacturer information
Honeywell International Inc.
Practical help
Common problems
Incorrect mounting method
Verify if your DCA is a high-torque model (150 lb-in. or 300 lb-in.). High-torque models do not use standoffs; standard models do.
Before use
- Ensure the installer is a trained, experienced service technician.
- Verify the product ratings match your application.
- Identify if your DCA is a high-torque model (150 lb-in. or 300 lb-in.).
- Check that all parts (Bracket, 3 Standoffs, 3 Screws, 3 Lockwashers) are present.
Specs in practice
- High-torque DCA
- Models rated at 150 lb-in. and 300 lb-in. which require direct mounting without standoffs.
- Standard Mounting
- Requires the use of 1/2 in. (13 mm) hexagonal standoffs.
Images and diagrams
- Fig 1: Exploded view of the bracket and standoff assembly.
- Fig 2: Standard mounting configuration using standoffs.
- Fig 3: High-torque mounting configuration without standoffs.
Model compatibility
- Designed for Direct Coupled Actuators (DCA).
- Mounting varies slightly for some DCA models.

Manual page author
David Miller
Documentation analyst
Organizes user manual content into clear summaries, with attention to model details, product context, and everyday usability.