Power / Solar Charge Controllers
User Manual for ECO-WORTHY MPPT 20A Controller
Quick guide for the ECO-WORTHY MPPT 20A Controller (Model: L03DZMPPT20A-1). Learn about installation, battery settings, LCD operation, error codes, and technical specifications.
Quick answers from the manual
Quick answer
- The ECO-WORTHY MPPT 20A Controller is a solar charge controller for 12V/24V systems. It features MPPT technology, Bluetooth app connectivity, and supports various battery types (GEL, SLA, FLD, LFP). Always connect the battery before the solar panel. p. 1, 3
Key actions
- Install the controller p. 3
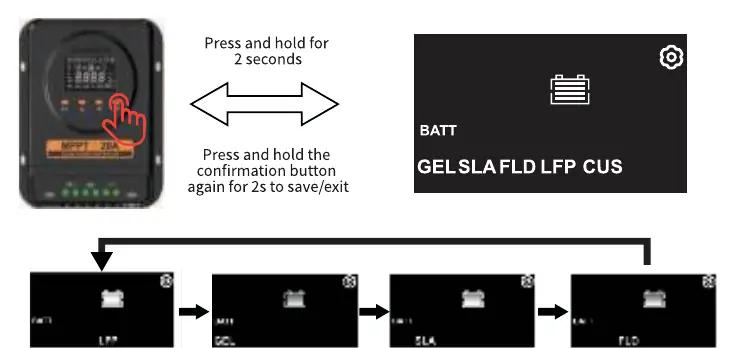
- Set battery type p. 8
First start
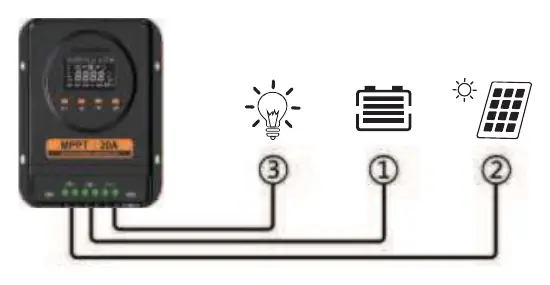
- Connect battery first, then solar panel. p. 3
Problems and fixes
LCD screen not lit
Check battery voltage (must be at least 10VDC).
p. 15Error codes
| Code | Meaning | Action | Pages |
|---|---|---|---|
| E01 | PV Over-voltage | PV voltage exceeds 95V. | p. 10 |
| E02 | Charge overcurrent | Charging current reaches 20A. | p. 11 |
| E03 | Battery High Voltage | Battery voltage exceeds set value. | p. 11 |
| E04 | Battery Low Voltage | Battery voltage falls below set value. | p. 11 |
| E05 | Battery Overcharge | Battery voltage reaches overcharge protection point. | p. 11 |
| E06 | Discharge Overcharge | Discharge current reaches over-discharge protection point. | p. 12 |
| E07 | Internal Temperature Overheat | Internal temperature too high. | p. 12 |
| E08 | Battery Temperature Overheat | Battery temperature >= 75°C. | p. 12 |
Technical specifications
| Parameter | Value | Meaning | Pages |
|---|---|---|---|
| Rated Current | 20A | Charging and Load current | p. 13 |
| Max PV Input Voltage | 100V | Maximum input voltage | p. 13 |
| Max PV System Input Power | 325W (12V) / 650W (24V) | Maximum solar panel power | p. 13 |
Where to find it in the PDF
- Installation p. 3
- Settings p. 7, 8, 9
- Technical Parameters p. 13
Table of contents
Manual images
Click an image to enlargeQuick guide from the manual
The ECO-WORTHY MPPT 20A Controller is designed for solar power systems. It uses intelligent algorithms to maximize energy capture from solar panels and protect batteries from overcharging and over-discharging. The device supports 12V/24V systems and various battery types (GEL, SLA, FLD, LFP). Always connect the battery first, then the solar panel.
Product Overview
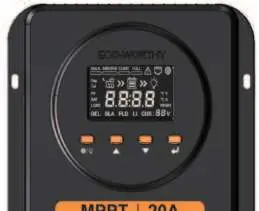
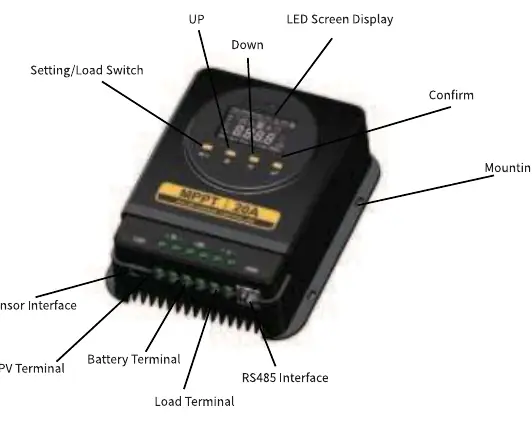
The controller features an LCD screen and four buttons for operation: Setting/Load Switch, Up, Down, and Confirm. It includes terminals for PV input, battery connection, load output, and an RS485 interface for communication.
Installation Steps
- Determine the installation location on a vertical surface. Ensure there is sufficient space above and below for cable management.
- Drill holes at the marked positions with a 6mm diameter and 30mm depth.
- Insert the M6x30 expansion tubes into the holes until they are flush with the surface.
- Secure the controller using the M4x30 Phillips pan-head self-tapping screws.
- Connect the wires in the following order: Battery first, then the solar panel. The screen should light up upon successful connection.
Usage and Settings
The LCD screen displays real-time status, including charging stages (Bulk, Absorb, Float, Full), battery voltage, and PV power. Use the buttons to navigate the menu:
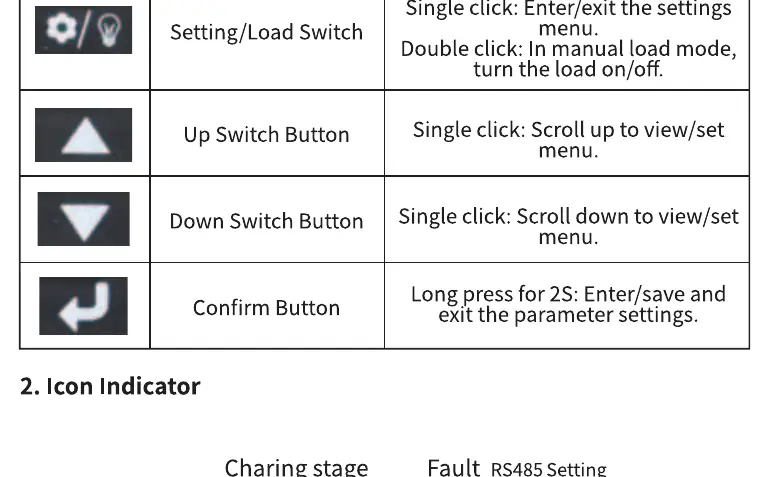
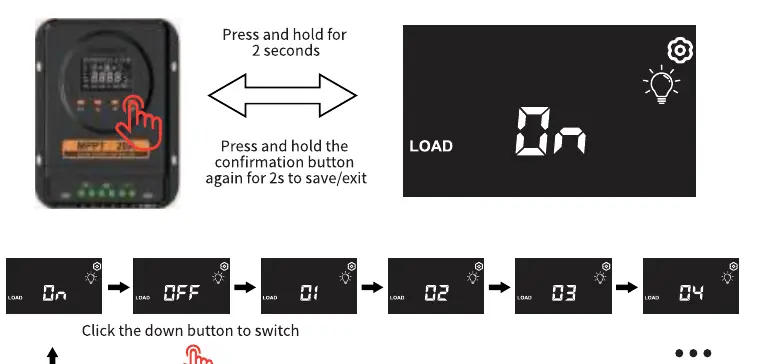
- Setting/Load Switch: Single click to enter/exit settings; double click to turn load on/off in manual mode.
- Up/Down Buttons: Scroll through menu pages or adjust parameter values.
- Confirm Button: Long press for 2 seconds to enter/save/exit parameter settings.
You can configure battery chemistry type, system voltage, load working mode, and temperature units directly on the device. Other advanced settings are available via the ECO-WORTHY mobile app.
Charging Stages
- Bulk Charging: Adjusts voltage/current to operate at maximum power point.
- Balancing Charge: Maintenance phase for lead-acid batteries to prevent overheating and gas accumulation.
- Float Charging: Final stage to maintain battery charge with a small current.
Troubleshooting and Maintenance
If the controller detects an abnormality, an error code (E01-E09) will flash on the screen. Ensure the device is installed in a location that is not easily accessible, as the heat sink may become hot. Keep a minimum distance of 30 cm from high-power devices to avoid electromagnetic interference.
Technical Specifications
- Model: L03DZMPPT20A-1
- Rated Current: 20A (Battery and Load)
- Max PV Input Voltage: 100V
- Max PV System Input Power: 325W (12V) / 650W (24V)
- Operating Temperature: -20°C to +60°C
- Communication: RS485, Bluetooth
Practical help
Common problems
LCD screen is not lit
Check battery voltage using a multi-meter. It must be at least 10VDC.
Controller is not charging
Check power connections and ensure PV input voltage is higher than the battery voltage.
Load is not working
Check if the load is turned off, if protection has been triggered, or if the connection cable is loose.
Before use
- Ensure sufficient space above and below the controller for cables.
- Drill 6mm diameter holes, 30mm deep.
- Connect battery first, then solar panel.
- Verify battery type (GEL/SLA/FLD/LFP) settings.
- Ensure load power is within the rated range.
Specs in practice
- Max PV Input Voltage
- 100V. Do not exceed this voltage to prevent damage.
- Rated Current
- 20A. Maximum current for both charging and load output.
- System Voltage
- 12V/24V auto-detection.
Images and diagrams
- The LCD screen displays charging stages, battery type, and system parameters.
- Buttons allow navigation through settings and manual load control.
Model compatibility
- Supports GEL, SLA, FLD, and LFP batteries.
- Built-in Bluetooth module for app-based control.

Manual page author
Emily Carter
User documentation editor
Prepares concise manual descriptions and highlights the most useful setup, operation, and maintenance information for readers.